Friday, December 19, 2014

Oh Look - Sharpie Mugs!


Yep, it's the eleventythousandth variation of sharpie mugs! Each year I always try to give something handmade to the members of my family. In the past I have done this with varying degrees of success (last year I learned too late that glass etching + me = failure!). December has totally kicked my buns this year - I've had some super secret projects in the works that can't be revealed until after the holidays. My lack of holiday time management had me extra excited to knock out these easy and cute projects in an afternoon.


I scored a zillion white mugs in varying shapes from Home Goods. To decorate I used oil based sharpies in extra fine and medium widths. I stuck with simple black because I didn't want the colors mutating in the oven.


I gave each mug a wipe-down with rubbing alcohol prior to writing on them, and I used blue painters tape to keep my writing semi straight. If you make a truly terrible mistake, you can quickly wipe it off with a cotton ball doused in rubbing alcohol, but I found this was only worth it for really awful mistakes because it tended to smear and require you to wipe off a large area.


I let the writing cure overnight prior to baking the mugs. I'm not sure if this had any real effect or not - it was mostly a product of laziness! I started the mugs in a cold oven and then baked them at 425 degrees for 30 minutes (start the timer after the oven has come up to temperature). Starting them in a cold oven helps keep the mugs from cracking, although most of my mugs claimed to be oven safe already.


I plan to pair each mug with a bag of home made hot cocoa mix for gifting. These also made great daycare thank you gifts, and at around $4 a piece I was able to make sure that every single daycare worker got a holiday thank you from our family.

I know sharpie mugs are old news in internet land, but I'm super pleased with how these turned out, especially given how quick they were to make. Definitely my favorite kind of holiday craft - cute, budget friendly, and fast!


Wednesday, December 3, 2014

It's Cute Surprise Box for November


I have recently discovered the wonderful world of kawaii surprise boxes. I'm incredibly indecisive when purchasing kawaii items, mostly because I just want them all! Surprise boxes are absolutely perfect for me - I don't need to make any decisions, I'm highly likely to love everything, and they are usually a good value. Plus, who doesn't love the anticipation? So here is what I received in my November Surprise Box from It's Cute.


It arrived packaged in a cute pink box with a very cute little card detailing all the items inside and their retail values.

Check out that cute Care Bear charm! I forgot to photograph him separately!

Happy kawaii goodness!!


I received three squishy charms. The big one is super weird! It's extremely squishy and almost sticky feeling? And it's huge! I find it oddly compelling and sort of icky at the same time!


I got two stationary items - stickers and a memo pad. I am super excited about the Rilakkuma space stickers! I love this series. The mini memo pad is adorable too.


I also got this super adorable alpaca plush keychain.  It's legs are a little lopsided, but it's still amazingly cute.


And a box of Re-ment! Wohoo! I got this fabulous candy house with tiny My Melody sweets.


And last but not least, I got this DIY candy kit. These are new to me - I think I need to look up some YouTube tutorials because I can't read any of the directions :)

I think this box was a super value for the $25 price. I'll definitely be getting future boxes!

What do you think about blind boxes? Do you love the surprise or want to know what you're paying for?

Saturday, November 22, 2014

DIY Tomato Cage Christmas Tree


Holy cow! This was a lesson in crafting endurance and bad Pinterest judgement. I had been searching for a front porch tree and was about to bite the bullet and buy one when I stumbled upon these tomato cage trees. I had an old tomato cage on the back deck. I have an unnatural love of deco mesh. Perfect project! Right? Maybe not... There was some bloodshed. There was some swearing. But I am pleased to report that what was once a neon yellow tomato cage has now been transformed into a pretty darn cute little tree. Here's the step by step, so that you can hopefully avoid the flesh wounds!


I began by zip-tying the pointy ends of the tomato cage together, kind of like a teepee. I used two zip-ties looped around each other to help keep the whole thing from sliding up and shooting off the ends of the cage. 


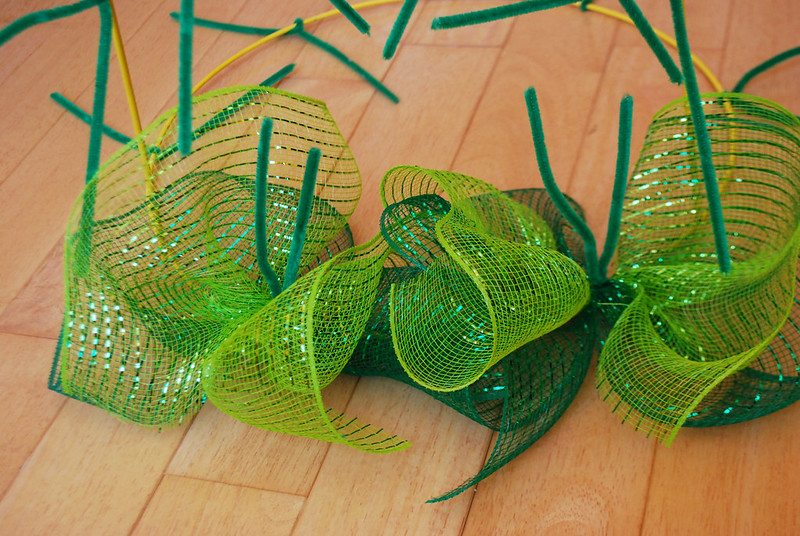
Then I covered my tomato cage teepee in pipe cleaners.


I used my rotary cutter and self-healing mat to cut my deco mesh for the tree filling.


My mesh was 12" wide, so I cut 12" lengths to make squares (which then immediately curled up into tubes).


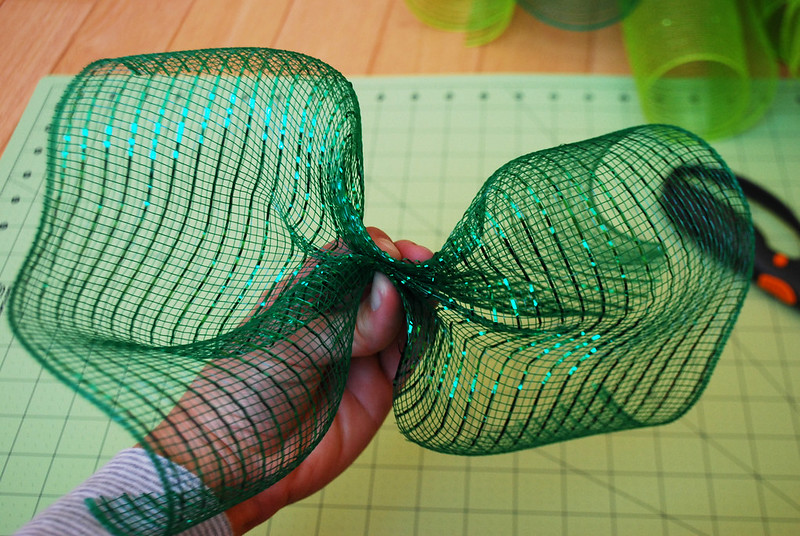
To make the filling tufts, I gathered a square in the middle so that it resembled a giant bow. This works best if you spread the square out so that it's curving away from you. I kept the factory sealed edges to the outside (gather from cut edge to cut edge) to help keep the unraveling to a minimum. I stacked two gathers together and then attach that bundle to the tomato cage.


To attach the tufts, I layered one dark green and one light green gather. Then I twisted the gathered bundle into one of the pipe cleaners. This process would have been much easier with a helper (someone to hold your first gather while you're bunching up the second). As it was, I was definitely sitting in the floor and using my toes - hence, no pictures of this process! It would save time (and finger dexterity) to layer the two colors before gathering, but I found this didn't make the tuft poofy enough to give good coverage on the tomato cage.


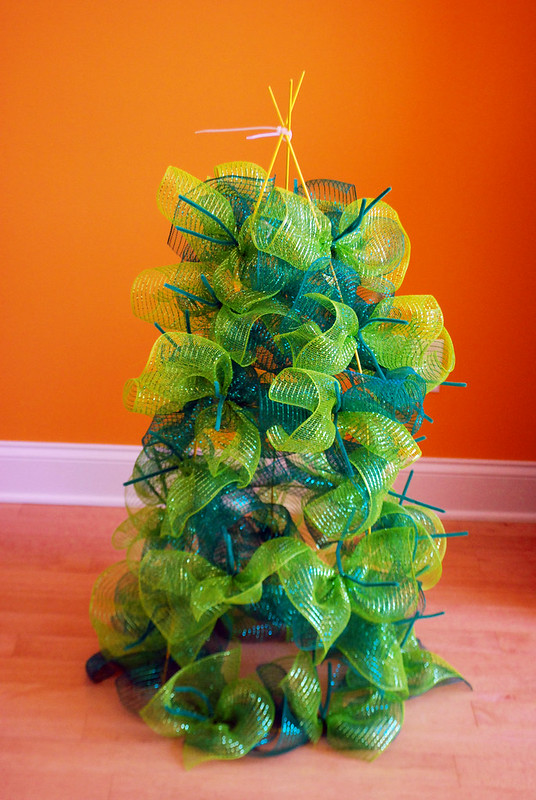
Here it is after all 30 pipe cleaners were filled. At this point I was panicking - it was pretty bald looking.


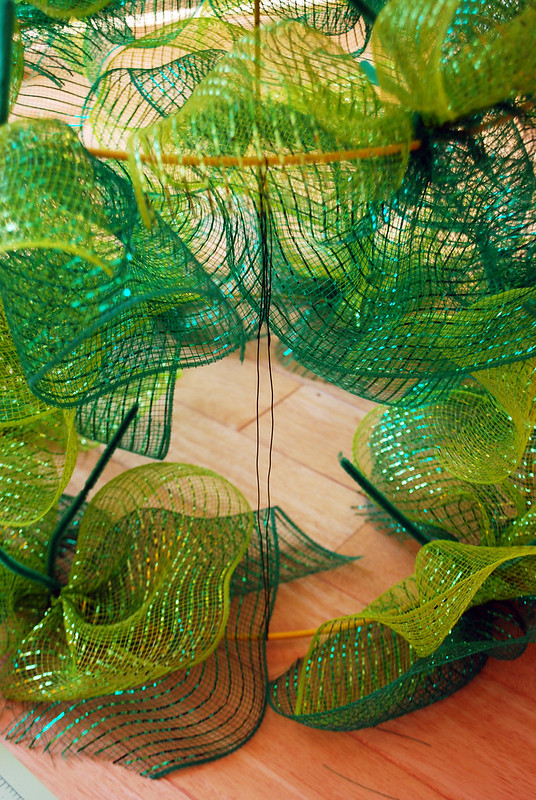
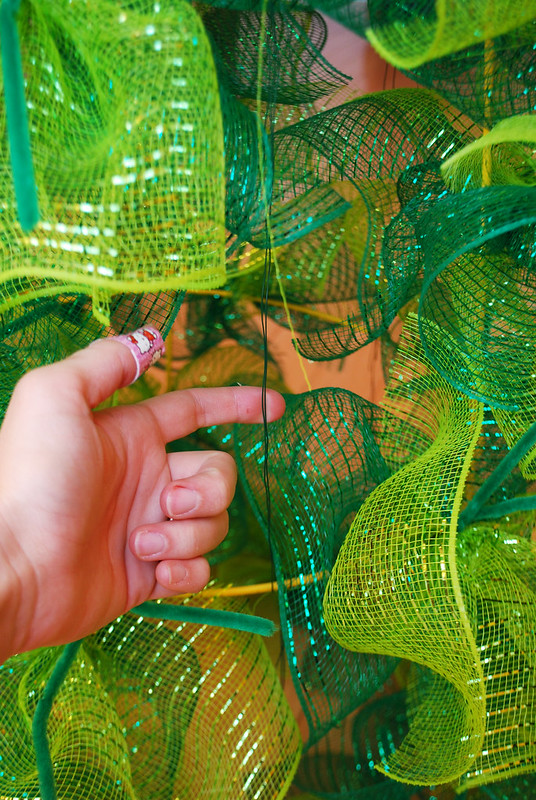
To fill in some of the gaps, I used floral wire to make bridges in between the tomato cage supports. This gave an additional spot to attach tufts. This is also where the bloodshed began! Floral wire is sharp!! Be careful!


I added a total of 6 wire bridges to fill in the bald spots. And some stylish HK band-aids to fill in the holes in my fingers!


This was after filling in the bald spots. It was looking much more tree-like now (and much more tempting to the cat, who took up residence in the center of the tree immediately following this picture). There was still quite a bit of yellow visible, so I kept adding tufts til I ran out of mesh. I used 4 rolls total (2 of each color).


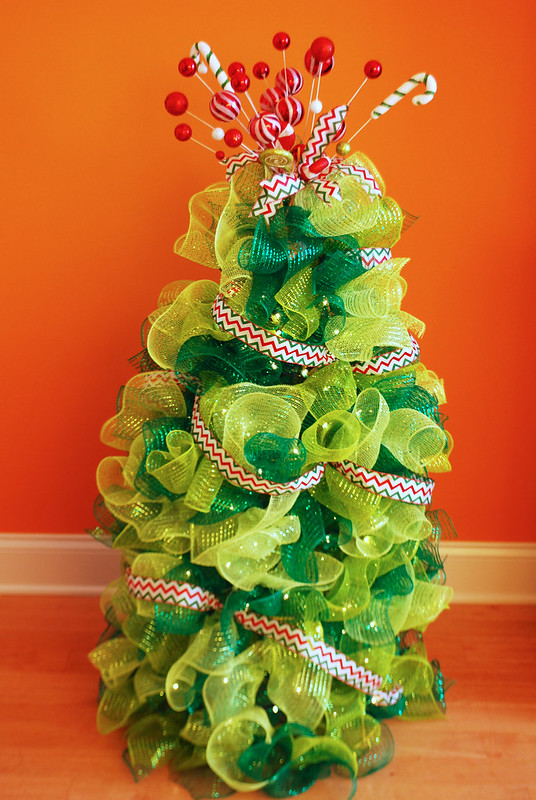
And decorated! It was actually really challenging to cover up all the tomato cage spikes at the top of the tree. I ended up using two more zip-ties to get the sproingy ball spike thingies (seriously, do those have a name?) to stay up around the top of the tree since there wasn't really anything of substance for them to stick into. Then I made tufts of ribbon to stab down around the tomato cage spikes for extra coverage.

Lights! Can you see them?
I added a string of lights prior to wrapping the ribbon around the tree. The lights and the ribbon really helped it look finished and covered up the rest of the yellow cage. Since I'm planning to use it on the porch I don't think I'll add any extra ornaments.

Things I would do differently if I were to make this again would be: 1) wear gloves to handle floral wire!! and 2) use a dark tomato cage. I think I caused myself a lot more headache than Pinterest implied because my tomato cage was so bright and therefore difficult to cover.

Overall I'm please with how it turned out. It's really cute when you aren't thinking about how much blood I lost making it. I can't say that I would be super thrilled to make another, but I did learn a lot from my mistakes so maybe another would be smoother sailing. What do you think? Have you persevered through some Pinterest almost-fails?

Wednesday, November 19, 2014

FO: Tiny Crochet Pumpkins


I've been trying off and on for years to learn how to crochet. My grandmother was a super awesome crocheter and we all have multiple blankets as testament to her mad skills. But try as I might, I was having a seriously difficult time making the cross over from knitting to crochet. I could kind of get the basic mechanics down, but I didn't really know what I was looking at. Not being super sure how to count the stitches was definitely hindering my ability to follow a pattern. I recently stumbled upon Twinkie Chan's awesome crochet video tutorials and something just clicked for me. I whipped up these two little pumpkins in mere hours!


I did have to do a little research after my first pumpkin to get the stitch count exactly right (turns out you're not supposed to count the stitch on the hook), but thankfully these little guys were pretty forgiving. I just used some random acrylic yarn I had lying around. Crochet was way faster than knitting, but it seemed to eat up yarn a lot faster too.


The construction was really easy. It's basically just a cinched together tube to get the little pumpkin lines. I love how easy it was to work in the round - I can't knit in the round to save my life! They look super sweet just sitting out with our fall decor, but I bet they would be awesome on a wreath. I want to see if I can make a few bigger ones for some variety.


We have been crazy sick around these parts, so it was nice to have a quick and surprisingly painless project, and I think I actually understand how to follow a basic crochet pattern now. But that means I've opened an amigurumi Pandora's box - I must crochet all the things!

Friday, November 7, 2014

Living room update with The Lotus Cat Tree


Isn't our new cat tree just gorgeous? I hemmed and hawed for months about whether or not to get this cat tree, but now that we finally have it I'm wishing we had done it sooner. For those of you unfamiliar with the cat tree scene, this is the infamous Lotus Cat Tree by the Refined Feline. It's quite an investment for a piece of cat furniture, which caused my initial hesitation. But after pricing out DIY options and not coming up with anything that was significantly cheaper and fit our home's aesthetic, we took the plunge. I scoured the internet for coupons and was able to get it for a pretty good deal.

Let's see why we were in such desperate need for a new cat tree:


Is this not the ugliest thing you've ever seen?? Besides the obvious unraveling, the carpet was impossible to keep clean. It was seriously nasty looking, and we hid it in our bedroom anytime we had company. But our cats loved the dang thing. They definitely needed a replacement. 


Serious improvement, right? I knew I wanted a primarily wooden tree for ease of cleaning, but I was worried the cats wouldn't like it as much as the nasty carpet. Thankfully both of our cats have taken to the new tree right away. Assembly wasn't any more difficult than your standard Ikea piece. The box arrived ridiculously beat up, but everything inside was packaged securely and nothing was damaged.


The shelves have carpet pads that attach with velcro. The carpet is very dense and doesn't seem to absorb hair quite like the last tree. Even though I wanted to avoid carpet, this small amount was a must for our super clumsy cat - she needs something to sink her claws into so she doesn't slide off the wood. The tree wobbles slightly when our (admittedly large) cats jump off, but it seems sturdy overall and I'm not concerned about it tipping.


At first I thought the scratching pad was in a really weird spot, but it actually works pretty well when the cats stretch out to full length. They don't seem to scratch this one as much as they did the carpet tree though.


Much to my surprise, one of our cats even likes the hidey-hole (Little Plum also likes hiding her toys in it!). The cushions inside and on top are super plush and squishy.


The curvy top shelf is also very popular. There's no way I could have gotten those great curves in a DIY piece.


Here's a before and after to really appreciate the magnitude of the upgrade. I can't believe we had that nasty carpet tree in our living room for so long! 


I hope that was helpful if you're considering investing in this cat tree. I searched and searched for owner photos to help me make my final decision, so I thought I'd contribute some of my own. In the end I'm really glad we went for it! Our pets are very much part of our family and I'm glad they have a place of their own (that isn't an eyesore!) in the living room.


Saturday, November 1, 2014

FO: 5th Avenue Infinity Scarf


Finally a finished knitting project to share with you! I am terribly bad to get sidetracked with a cute doll design for my shop and let human sized knitting projects drag on for months (or sometimes years...). This particular scarf might have been hanging around the craft room an embarrassingly long time!

The pattern is the 5th Avenue infinity scarf from Tentenknits. The pattern was straightforward, with just enough variety to be interesting while still falling into the mindless-TV-knitting category. 


I had two fairly major hiccups during this project, one I recovered from and one I just lived with. The first was starting without a stitch marker. What was I thinking?? After setting the project aside for a while I had no idea where I was when I picked it back up. Lesson learned - don't be lazy and go get a dang stitch marker!


The second hiccup I only discovered several inches in, when I realized I'd gotten things twisted when I joined in the round. Oops. By that point I'd already started and stopped enough times that I just couldn't bear to rip it all out and start over. When it's all looped around my neck I don't think it's hugely noticeable.


The yarn I used was Moda Dea washable wool. I have tons of this stuff that I scooped up at a local craft store's closing sale several years ago. I find it nice and soft to wear against skin, and it has a fun squishy quality to it. The edges of the scarf are super curly, even after blocking. I'm not sure if it's the yarn or the pattern, but it kind of works in my favor with the whole mobius-mistake that I'm rocking. I knit it on my Knit Picks interchangeable needles in size 8, which felt like tree trunks after knitting so many doll projects on teeny tiny needles.


I think it turned out pretty cute, even with my mistake, and I'm sure I'll get lots of use out of it this winter. I should knit for full sized humans more often!

Thursday, October 23, 2014

Our Fall House

Just popping in to share a few of the fall and Halloween details that have come out to play around our house.

I heart deco-mesh wreaths a ridiculous amount.


Dolls are totally decor items. Right? Right.


I am so pleased I haven't managed to kill the mums yet!


Our fall porch, ready for trick-or-treaters.
I wasn't quite ready to give up summer this year, but all those pumpkins do look pretty happy around the house!